Due to a recent conversation with a fellow VW enthusiast and transmission mechanic, I concluded that I should put the 6V flywheel back on.
[18:59] friend: i need to tell you the easy way to get the gland nut loose on the flywheel
[19:03] friend: by the way, late 12v O-ring flywheels won't go all the way on early pre "F" cranks
[19:05] friend: not hard to modify the flywheel, just need to enlarge the hole in the thrust face where the o ring is,
[19:05] friend: or turn down the step in the crank if the motor is torn down
[21:15] kd7nyq: how does that work?
[21:15] kd7nyq: I just can't bolt it on?
[21:23] friend: if it bolted on right you have no problem
[21:24] friend: there is a step on the crankshaft, the snout that sticks into the flywheel is smaller in diameter than the mainbearing diameter
[21:25] friend: the length of the reduced diameter is shorter on cranks made before 1966 (pre "F"), than cranks 66 and later
[21:27] friend: 1200's made after 1966 (though not sold in the US) have the longer reduced area.
[21:27] kd7nyq: so aside from having an excessive gap, is it a problem?
[21:28] friend: if the crank doesn't pull all the way down there will be too much end play, like 1/8"
[21:28] friend: grab the pulley and see how much end play there is
[21:29] friend: the early 6v flywheels didn't have an "O"-ring
[21:30] friend: and the hole in the flywheel is larger, it's the lip for the flywheel that causes the interference
[21:31] friend: some aftermarket flywheels had this area bored a little large to avoid that problem
[21:31] friend: flywheel shimming is another touchy spot
[21:32] friend: under the flywheel seal are 3 shims of varying thickness
[21:34] friend: these should give .004" to .006" end play, on a used motor dont try to get this exact, because if the #1 mainbearing is loose in the block it will give a false reading and if you shim too tight it will spin the main bearing
[21:35] friend: when changing flywheels on old running motors i check the spigot depth on the 2 flywheels with a depth mike and shim accordingly
[21:36] friend: if lucky they are both within a couple thousandths and the shims will not need to be changed
After considering the necesity to change the flywheel back, I found this post on an awesome VW blog: 12v Starter on 6v flywheel. So, when I get tired of running the 6V starter on 12V, I'll mimic this great hack and get on with life.
Wednesday, April 23, 2008
It's ALIVE!!!
 After all the mess we made exchanging the flywheels, we set ourselves on finishing what we had started. When I arrived home early in the morning, I did a basic test to make sure we had spark. The starter was hooked up and the cylinders were oiled. I simply could not get it to start, however. Before I went to bed, I decided to check on the carburetor. I saw something quite peculiar -- the main jet was flooding, creating a pool of gasoline on top of the throttle plate.
When we regrouped the next morning, we disassembled the carburetor and found that the stop valve in the float bowl was not functioning properly. Luckily, this was an easy fix as we had an extra hanging around. We put the whole thing together, swapped out the starter we were using for one in better condition, and the engine came alive. It was a great feeling, similar to the feeling that occurs after all the windows are opened to let out the smoke from the house after an engine is started for the first time.
Just for reference, I have found that the following usually needs to be checked before an engine will work after a long time in storage:
Fuel Pump -- Often the diaphragm breaks and a new pump is needed.
Coil and Points -- Just make sure you have spark.
Carburetor -- I have had problems with both the stop valve and the accelerator pump on various occasions. The channels on the smaller carbs can be easily blocked up as well.
Voltage Regulator -- My generator has always worked fine, but the regulator has almost always needed to be polarized.
I also put an ounce or so of oil into each cylinder as directed by the Idiot Guide, especially as I'm usually unprepared to turn the engine around sufficiently to prime it.
Tuesday, April 22, 2008
Flywheel
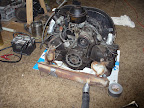
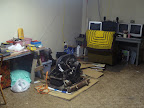 Due to the high winds (see last post), we were forced to go indoors. One of the great mysteries that have stayed in the back of our minds was the nature of the 40HP beast that has found a corner in the basement. Should we dare disturb it? We decided that fate was in our favor.
When I left the car originally, I had removed the distributor, hoping to fix it in the near future. It was an easy fix, it just never got done. We found amongst our treasures enough bits to make a working distributor to replace its broken counterpart. Additionally, we had in the same troves a couple 12V starters, plug wires, plugs, and a 12V flywheel. The bell housing that we were to use was generously donated by a friend when he shipped us the transmission.
I should explain that during our planning stage, we agreed that since we were going to dedicate ourselves to a complete 12V system, we should scrap the 6V starter that had so faithfully served us. The only problem with this idea is that the 12V starters have a different gear than the 6V equivalent. Thus, the 40HP flywheel would not fit the 12V starter. It would have to come off.
We adjusted the valves, set the timing, and got everything ready, saving the flywheel for last. We spent the rest of the available time trying to get the flywheel off. It didn't come off. I left Steve with this sacred assignment.
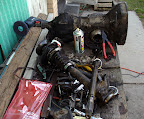
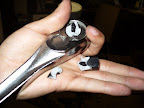 I cheerfully went about my weekday, only to hear the fated news. I received this photograph before I went home that day. Luckily, Sears has a no-questions-asked return policy. Either a 3/4" socket or a 1/2" breaker bar would be in order, whichever came first.
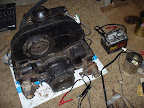
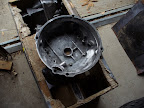
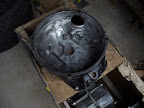
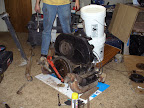 The next day, we continued. By the time we had gotten the flywheel nut off, we had two buckets of grain, Steve, and parts of the engine stand holding the engine to the floor. To hold the flywheel in place, we bolted a monkey wrench against the heater boxes. More of the engine stand was used as a cheater bar.
To end the ordeal, we used a pry bar to pry the flywheel off the dowels while we rotated it. A warning for future travelers of this strange path: the 6V flywheel is a lot heavier than the 12V counterpart!
Saturday, April 19, 2008
High Winds
This is just a brief post to explain our apparent lack of enthusiasm for the VW in recent days. According to normal spring weather, the winds started to come up and our tarps started to come down. As a result, we took them down. Thus, in addition to the fact that we cannot sand or paint without a compressor, we have not tarps to protect the body and the fresh paint. We are currently plotting our counter-attack in the form of a press-board enclosure, which will be a bit more useful against the wind.
Friday, April 18, 2008
Compressor
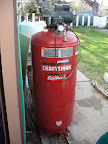 Through various experimentations with my uncle's small air compressor, we were able to achieve some sand blasting action, but by no means was it impressive (you'll notice there are not pictures to illustrate). We did decide, however, that it would be worth our while to get ourselves a large enough compressor to not only sand, but also paint and use the very convenient air tools that are available. After much searching, we came across an ad for a very large compressor with a few mechanical failures, but nothing serious. We paid $60 for it.
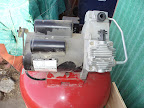
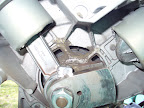 The first of the two main problems we found were that there was a connecting rod missing from one of the cylinders. This comes in a kit from Sears and didn't cost us much -- about $45. It is a bolt on job, only requiring that the head be removed and the new piston put into place. The second issue was that the outlet tube from the compressor that feeds the tank had been removed. This was less an issue, but the parts were not readily available. We are still waiting for them to come in the mail. The tube and the hardware come to about $15. Of course, you can also see that we have no air filters which are very nice considering the amount of air this thing will be pushing around. We are going to grab some lawn mower filters ($3/each) to stick on the intake manifolds, which are conveniently the correct size.
Friday, April 11, 2008
Sand!
 There is not much to report today. We took the pleasure of getting a few needed items, including primer, undercoating, body hammers, and sand. There should be no reason to not get some real painting done tomorrow.
Thursday, April 10, 2008
Extreme Sanding: The Prequel, Continued
As we've been waiting for the big day when we would be able to break out the sand-blasting equipment, we've started to make the major cuts and removal the remaining accessories from the body and the pan. Two major issues were found, both apparently being due to the incompetence of the previous owner(s).
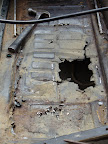 First, we found that instead of cutting out the rust and welding a new sheet of metal where it occurred in the floor pan, it was seen somehow prudent to simply screw in a new sheet to the floor pan via 2" machine screws. When we removed the sheet that had been screwed in, we found another one, done in the exact same manner, underneath the first. Luckily, the repairs necessary aren't that extensive despite the previous neglect.
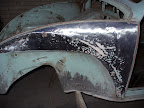
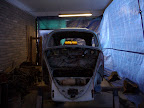
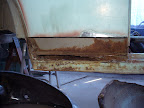 The other thing that we found was a similar condition on various parts of the body. Steve took it upon himself to take off the Bondo with the abrasive discs while we were waiting for the sand-blaster. The first patch was only what we expected, a large amount of dents that hadn't been taken out properly over the left-front wheel well. The second patch exposed a large crack in the sheet metal on the rear skirt. The third patch exposed a mesh of fibre-glass covering buried treasures of rust in the right wall. We're still pondering how to treat it all.
First, we found that instead of cutting out the rust and welding a new sheet of metal where it occurred in the floor pan, it was seen somehow prudent to simply screw in a new sheet to the floor pan via 2" machine screws. When we removed the sheet that had been screwed in, we found another one, done in the exact same manner, underneath the first. Luckily, the repairs necessary aren't that extensive despite the previous neglect.The other thing that we found was a similar condition on various parts of the body. Steve took it upon himself to take off the Bondo with the abrasive discs while we were waiting for the sand-blaster. The first patch was only what we expected, a large amount of dents that hadn't been taken out properly over the left-front wheel well. The second patch exposed a large crack in the sheet metal on the rear skirt. The third patch exposed a mesh of fibre-glass covering buried treasures of rust in the right wall. We're still pondering how to treat it all.
Wednesday, April 9, 2008
Transmission: The Arrival
The transmission finally arrived after much tribulation and hardship. Our comrades of the Western shores were reluctant to help us in our time of need, but alas! There was UPS. What can Brown do for you?
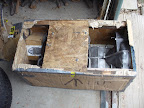
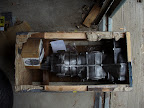 It was a real pleasure to finally receive the transmission that had been prepared since the beginning of the Beetle's restoration. It arrived around noon on 9 April 2008. As you will note in the pictures, it was packed extremely well.
 One added bonus was the extra bell housing which will be used to bench-start our various projects. As you may know by following my entries, we now have three motors in various stages of repair. This item will be of great value in the attempts to build them back up into running order.
It was a real pleasure to finally receive the transmission that had been prepared since the beginning of the Beetle's restoration. It arrived around noon on 9 April 2008. As you will note in the pictures, it was packed extremely well.One added bonus was the extra bell housing which will be used to bench-start our various projects. As you may know by following my entries, we now have three motors in various stages of repair. This item will be of great value in the attempts to build them back up into running order.
Monday, April 7, 2008
Extreme Sanding: The Prequel
Over the weekend we didn't get much done that constitutes work. I participated in the LDS General Conference which required a sum total of ten hours over the course of the weekend. What we did do, however, convinced us of the need to invest in some sand-blasting gear. While the paint-stripping wheels work well for getting the plain surfaces of large body panels, it is impossible to get into the narrow bits and make a complete go of it.
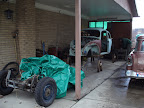 The result of our recent interest in sandblasting set us on a quest to make something of a clean environment large enough to contain the Beetle body. We got permission to move my uncle's Chevrolet that you might have seen in my photos and has been sitting under the carport for the longest time. To aide in this endeavor, my uncle also provided an air compressor to air up the tires on the said Chevy. Hopefully this compressor will be available for more use later.
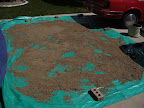
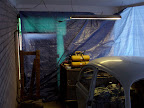 After cleaning up the space and switching the locations of the Volkswagen and the Chevrolet, we installed a wall of tarpaulin to insulate the car from the outside world and to keep the blasting particulate and later paint from escaping into the neighborhood. I managed to do the first half while Steve followed up after I went to work.
By this weekend, we should have all of the gear necessary to start particle blasting the body of the beetle and make the
The result of our recent interest in sandblasting set us on a quest to make something of a clean environment large enough to contain the Beetle body. We got permission to move my uncle's Chevrolet that you might have seen in my photos and has been sitting under the carport for the longest time. To aide in this endeavor, my uncle also provided an air compressor to air up the tires on the said Chevy. Hopefully this compressor will be available for more use later.After cleaning up the space and switching the locations of the Volkswagen and the Chevrolet, we installed a wall of tarpaulin to insulate the car from the outside world and to keep the blasting particulate and later paint from escaping into the neighborhood. I managed to do the first half while Steve followed up after I went to work.By this weekend, we should have all of the gear necessary to start particle blasting the body of the beetle and make the
Sunday, April 6, 2008
Oh, The Pretty Colors!
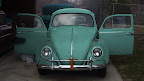
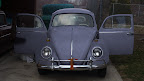
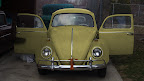
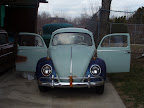 This may seem like a small affair, but it seems like the color of a car should be chosen carefully. My companion, Steve, has come up with some mock-ups of the Beetle with colors of my choice. I would like to make a request that the readers of this blog vote for their favorite color amid those presented. To vote, just write a comment and tell me which is your favorite color. Feel free to include links to pictures of other Beetles with the color of your preference if you don't like mine!
Thursday, April 3, 2008
Transmission
The weather has been bad recently to the point that we had to buy tarps and cover everything up. Thus, we haven't done any real body work. Out of boredom, however, I started the disassembly of the transmission despite the weather.
Seeing as how I'll probably end up with a transmission through the mail, it will not be shipped with a number of the internals or the axles or axle tubes. As a result, we have to salvage these parts from my current transmission. Mind you, I have no objection. I don't want to pay the foot and fingers that it would take to get the tranny here.
The suspension and brakes came apart without problem. The brakes appeared to be in good condition despite their lack of replacement. The shocks made an impression on the both of us as we closed and opened each shock with ease.
 It didn't take any time to get the right axle assembly apart and out of the transmission. Piece of cake. We learned, however, that not all wheel bearings are the same. While the right assembly took minutes with the proper tools, all sliding apart quickly and easily, it took two days for us to get the left axle tube off of the axle. The cause of this? The wheel bearing made an exceptional attachment to the axle. Our reaction? We had to finally break down and buy the gear puller and just get it done.
Tools required for the job:
13mm, 15mm, and 17mm Wrenches
13mm, 15mm, and 17mm Sockets
Ratchet
Crescent Wrench
Pliers
Snap-Ring Pliers
Gear Puller
With a special thanks to PB, the miraculous penetrating oil.
 We couldn't have done it without you, PB!
Seeing as how I'll probably end up with a transmission through the mail, it will not be shipped with a number of the internals or the axles or axle tubes. As a result, we have to salvage these parts from my current transmission. Mind you, I have no objection. I don't want to pay the foot and fingers that it would take to get the tranny here.
The suspension and brakes came apart without problem. The brakes appeared to be in good condition despite their lack of replacement. The shocks made an impression on the both of us as we closed and opened each shock with ease.
It didn't take any time to get the right axle assembly apart and out of the transmission. Piece of cake. We learned, however, that not all wheel bearings are the same. While the right assembly took minutes with the proper tools, all sliding apart quickly and easily, it took two days for us to get the left axle tube off of the axle. The cause of this? The wheel bearing made an exceptional attachment to the axle. Our reaction? We had to finally break down and buy the gear puller and just get it done.Tools required for the job:
13mm, 15mm, and 17mm Wrenches
13mm, 15mm, and 17mm Sockets
Ratchet
Crescent Wrench
Pliers
Snap-Ring Pliers
Gear Puller
With a special thanks to PB, the miraculous penetrating oil.
We couldn't have done it without you, PB!
Subscribe to:
Posts (Atom)

